Announcement

Collapse
No announcement yet.

24Ve maximum ballast writeup...

Collapse
X
 
  • Filter
  • Time
  • Show
Clear All
new posts

    #61
    Maybe I'm bad at math but...
    62"x30"x31"=57,660/1728 = 33 cu ft. for just the main body. You say the arms are holding 12 additional cu ft which comes out to 45 total if the sac could totally expand. Using Dan's # up there, you could theoretically come up with 2,809 lbs for that 45 cu. ft sac (if it could fill all the way).

    Comment


      #62
      Originally posted by duffymahoney View Post
      Gosh I would love to try and fit even bigger sacs in! I bet I could figure out something for my pumps and batteries.
      Figure out how to use an electric water pump from a car:
      http://www.meziere.com/ps-1068-1036-wp301r.aspx
      55 gpm = 3,300 gph.

      Comment


        #63
        I have my 1800 pounders, plus 250 on the swim deck plus 200 in the lead in the rear corner. But I would love 2200 in a custom sac! Then I could put the lead in the bow.
        Build thread: http://www.tigeowners.com/forum/showthread.php?14787-Duffy-s-2005-24v-wakesurfing-mod-thread&highlight=duffys+24v

        Comment


          #64
          Originally posted by embo View Post
          Does anyone know if this foam insert and floor design is the same for a 05 22v? If so, what is the purpose of this design as oppposed to leaving the actual bottom of the boat exposed and just putting carpet over it?

          Love the pics and description of what you have done. Looking forward to the "rest of the story".
          I can hear Paul Harvey now!

          Comment


            #65
            Originally posted by Dan and Christy View Post
            I can hear Paul Harvey now!
            Exactly!

            Comment


              #66
              Originally posted by Fiveflat View Post
              Not sure why you would want to replace the volume of a battery with water. The battery is going to weigh a lot more that that same volume of water.
              True, but the batteries being back there means you must have a protected volume for them to live in. Then there's the cables that must route to them. And so forth.

              The batteries themselves don't represent that much volume, well under a cubic foot. The key here is to get EVERYTHING out of the ballast area, so you can have nothing but ballast back there.

              Meanwhile, my approach keeps the batteries back against the transom. Moving them forward under the seats, as many people do, offsets the weight of the ballast in the stern. The batteries have to live somewhere - best to have them in the stern where their weight is an asset instead of a liability and the battery cables can be kept short.

              The primary design goal here is to concentrate weight in the stern. The batteries are back there, with their weight centered so they don't bias to either normal or goofy side. The bias comes from the fat sacs, and with the batteries relocated to the center I have maximum flexibility for normal or goofy.

              That's my theory, anyway.
              Last edited by IDBoating; 08-25-2011, 06:04 PM.

              Comment


                #67
                Originally posted by Timmy! View Post
                Maybe I'm bad at math but...
                62"x30"x31"=57,660/1728 = 33 cu ft. for just the main body.
                I'm derating to allow for sloped hull surfaces, various protruberances here and there, etc.

                Comment


                  #68
                  Hopefully, I'll get to ride it on Sat. Maybe I could get some air with my IS Blue Lake!?!
                  2009 RZ2, PCM 343, MLA Surf Ballast, Premium Sound.
                  2013 Toyota Sequoia 4WD W/Timbren SES

                  Comment


                    #69
                    I can come down from sandpoint anytime. I have custom shred stixx for people to try as well!!
                    Build thread: http://www.tigeowners.com/forum/showthread.php?14787-Duffy-s-2005-24v-wakesurfing-mod-thread&highlight=duffys+24v

                    Comment


                      #70
                      Originally posted by Ewok View Post
                      Hopefully, I'll get to ride it on Sat. Maybe I could get some air with my IS Blue Lake!?!
                      We shall see. We'll have the video running {grin}. And you can hop on our IS Infectious too.

                      Comment


                        #71
                        Originally posted by Timmy! View Post
                        Figure out how to use an electric water pump from a car:
                        http://www.meziere.com/ps-1068-1036-wp301r.aspx
                        55 gpm = 3,300 gph.
                        I like the way you're thinking! Last winter I spent the entire time researching and dreaming up my current approach. But next winter is coming... might be time to step up on fill/drain speeds!

                        Comment


                          #72
                          Originally posted by duffymahoney View Post
                          I can come down from sandpoint anytime. I have custom shred stixx for people to try as well!!
                          Hey Ewok, there's another Tige for our mini-reunion!

                          Comment


                            #73
                            Originally posted by WABoating View Post
                            Hey Ewok, there's another Tige for our mini-reunion!


                            I would love to try the shred stixx!
                            2009 RZ2, PCM 343, MLA Surf Ballast, Premium Sound.
                            2013 Toyota Sequoia 4WD W/Timbren SES

                            Comment


                              #74
                              Originally posted by WABoating View Post
                              I like the way you're thinking! Last winter I spent the entire time researching and dreaming up my current approach. But next winter is coming... might be time to step up on fill/drain speeds!
                              I have one of these pumps on my Corvette and they are very durable and somewhat cheap to rebuild ($50) when they wear out. I think they last ~2,500 hours or so.
                              I have this model: http://www.meziere.com/ps-813-781-wp118hd.aspx which would allow someone to just build up a manifold of sorts and bolt it in. Maybe it would even hook straight up to a sea strainer?

                              Comment


                                #75
                                Next: Protect your Sac!

                                That's what they say in contact sports, and it applies to ballasting too: Protect your sac. In this case, those expensive custom fat sacs.

                                Now that the lockers are cleaned out, they need to be cleaned up. Removing the walls reveals all sorts of potential hazards for fat sacs that press against things with the pressure of all that water. Since much of this space was hidden behind walls and floors, Tige doesn't need to worry about it. But we do, so here we go.

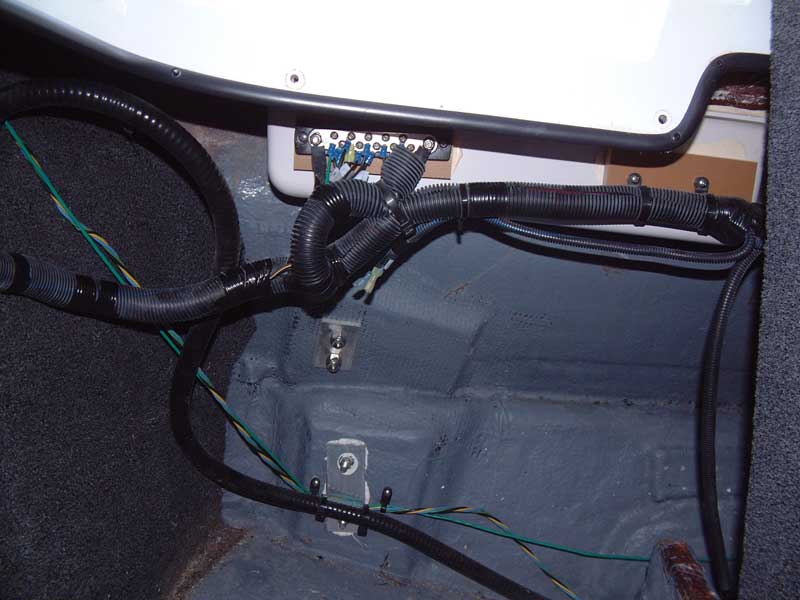
                                First up, considering the wiring at the top of the starboard locker:


                                That big old mess hanging down there is a hazard for the fat sac. It's also a hazard for itself, since the fat sac will be pressing up against it, then relaxing when the sac is drained, then pressing, then relaxing, etc. The wires are stranded, but they still don't benefit from all that additional flexing.

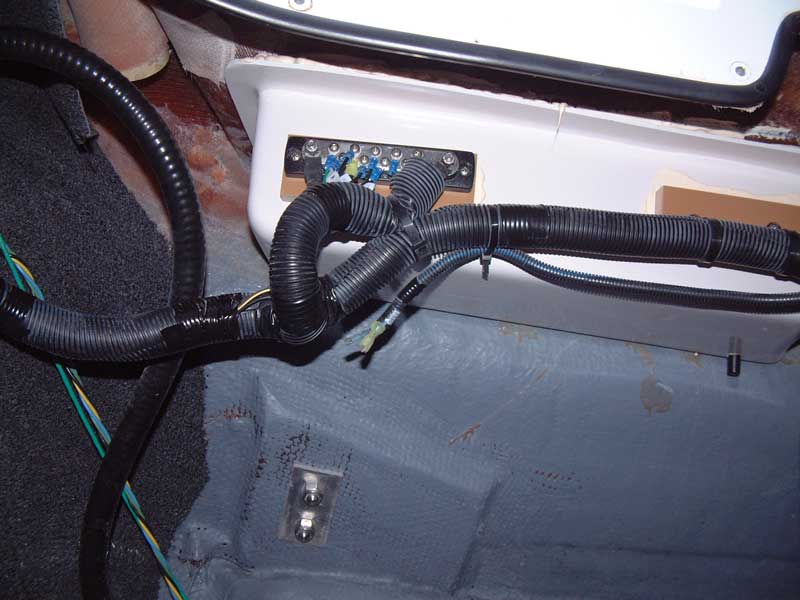
                                Here's a closeup of what's happening there, at a higher angle to show things that are partially concealed behind that deck flange:


                                This is one of the main harnesses running most of the length of the 24Ve. That screw plate is a grounding bus; a couple of nice heavy 4 gauge cables connect at the ends, and a whole series of smaller wires get their ground references on the screws in the middle. But this causes everything to hang down, flexing when the boat jostles and getting bent when the fat sac fills and empties. Also, the tyraps (aka "zipties") have sharp little ends on them that can poke holes in fabric, even heavy duty fac sac fabric.

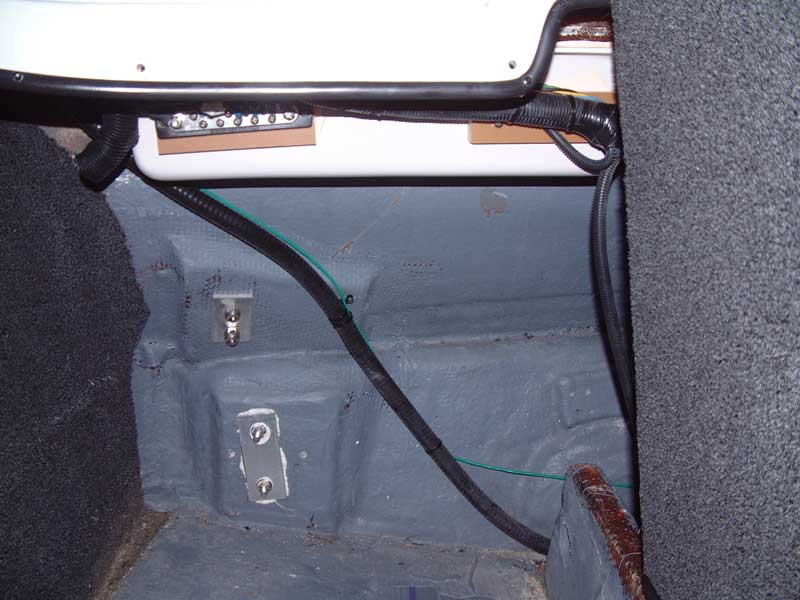
                                So we clean it up, and it then looks like this:


                                Now the harness is hidden and protected behind that deck flange. A line between the flange edge and the corner of the rear storage compartment (that white vertical surface on which the grounding bus is mounted) now misses the harness entirely, which means that when the fat sac is filled it too will miss it.

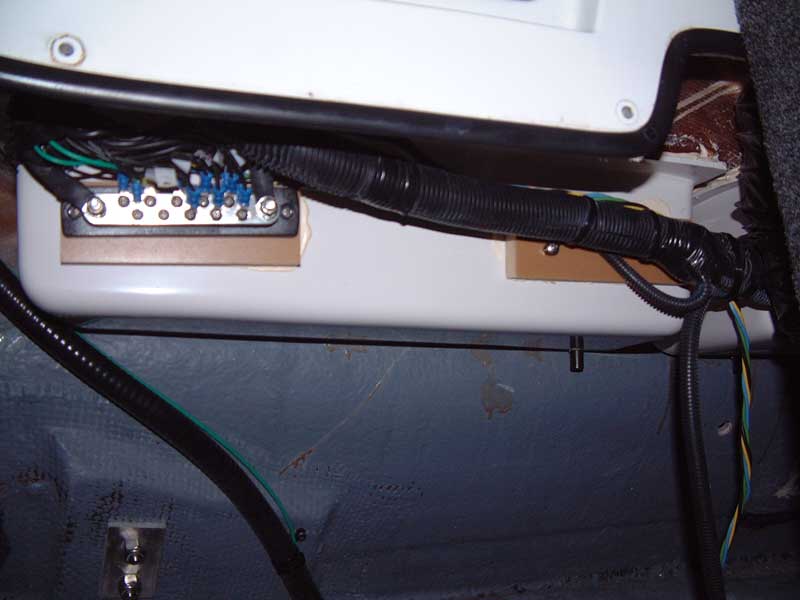
                                Here's the closeup:


                                First we invert the harness so that all of its connections to the grounding bus come in from the top, instead of the bottom. That alone does most of the work; the harness is moved quite a ways higher than before with this one step. Then we remove all of the existing screw-down tyraps and replace them, this time mounting them with the screw ends BELOW the harness (so it is suspended above the screws) instead of ABOVE the harness (which causes it to hang down lower). This also orients the tyraps so their sharp ends are behind the harness and pointing up, away from the fat sac which will eventually occupy this space.

                                A few reroutings of subharnesses, and a sanding block to take down the sharp edges and corners of those amber screwblocks, and this harness area no longer poses a threat.

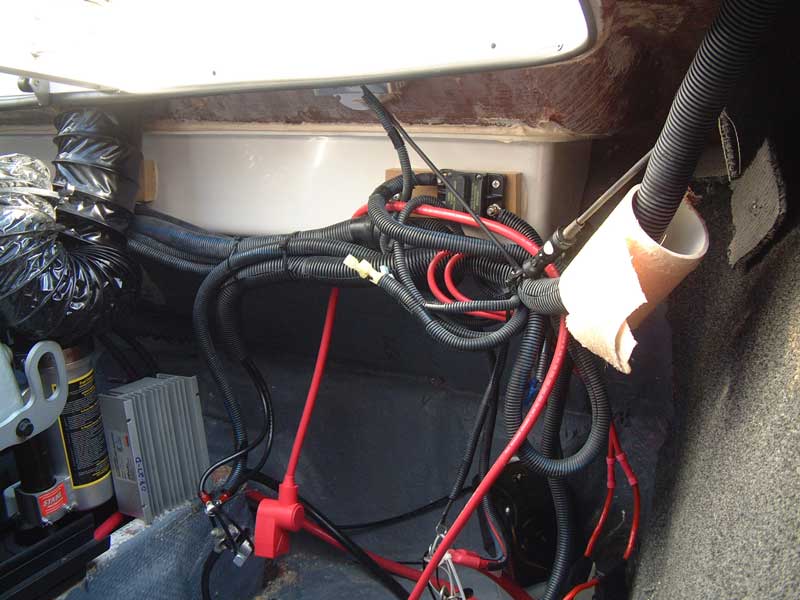
                                The port locker's wiring harness was even scarier:


                                In addition to being a real mess, this side has the big thermal breaker, some inline sound system fuses, the cable for the swim deck audio control, battery cables, etc. The PVC pipe through which the harness ran had also broken free from the underside of the deck, and was therefore providing no support whatsoever.

                                (A word of warning: See those red crimp-style splices on the red-insulated wires near the lower right corner of the photo? Those are powerlines for the sound system, and they fell apart in my hands the moment there was a slight pull on them. I've learned from bitter experience that crimp-style splices are horribly unreliable and should never be used on a boat (or anywhere else for that matter). These, and their brethren in the black ground wiring system, were removed and their connections tinned, soldered, and heat-shrinked to insure reliability.)

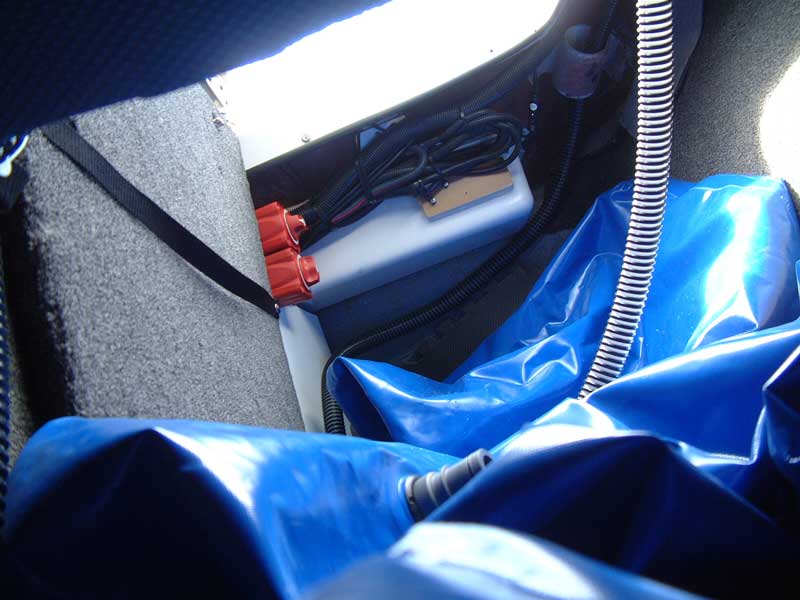
                                As with the starboard side, this nightmare was cleaned up and "lifted" into the space protected by the storage compartment and the deck flange:


                                Also, the thermal breaker and all fuses on both sides were relocated to just below the hinge on the engine (center) hatch so they could be accessed even if the fat sacs were filled.

                                The PVC pipe was removed from the harness (which, due to the new routing, didn't need its support anymore) and epoxied back into place under the deck. It then provided support for the sac's drain hose, as can be seen in the photo above.

                                The miscellaneous other wires, hoses, etc. were dealt with based on their locations and destinations. (Of special mention are factory hose clamps on things like fuel lines and vent lines... most required reorientation to put their sharp edges on the side opposite the sacs.) Once this was all completed, it was time to handle the exposed fiberglass surfaces.

                                The factory locker is a nice, carpet-lined box. With walls and floors removed, though, lots of un- and semi-finished fiberglass is exposed. The carpet that remains can be relied upon to protect the fat sacs, but something must be done for all those unfinished surfaces.

                                Harbor Freight to the rescue! For about $10 you can buy 16 square feet of closed-cell foam intended for use on garage floors and other wet environments. Closed-cell foam does not absorb nor retain moisture so it is perfect for the hull of a boat. It's also nice and cushy, the pieces are thick enough to protect the fat sacs from fiberglass while not consuming much of our precious ballast volume, and they cut easily with scissors.

                                The floors and engine stringers were covered with this floor foam. The transom was, too - but more on that in a moment. Then pieces were cut to go on the underside of the seat platform where the arm of the fat sac would extend when it was deployed.

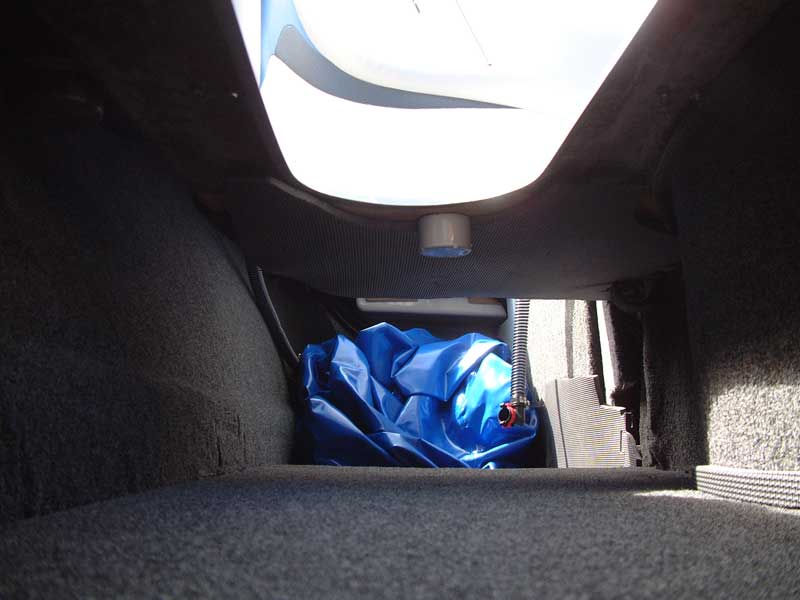
                                Here's the resulting view from the front of the underseat storage:


                                A couple of extra notes about this photo. First, see the PVC end cap on the seat support? That covers the hole through which the bolt on the rear seat protrudes. That bolt is small enough that pressure from the sac could cause a puncture. A PVC cap has rounded edges and permits the bolt to stick through without touching the fat sac. A thin line of 3M 4000 adhesive does a nice job of holding the cap in place while still permitting it to be removed if necessary. An array of holes drilled in the edge of the PVC cap prior to mounting prevent water from building up in the cap (since water often accumulates under the seat cushions).

                                The same PVC end cap trick was used to cover the bolts and backing plates for the lifting eyes and swim platform brackets back on the transom. While larger than the seat cushion bolts, they still have sharp threads and pose a hazard to the fat sacs. Four inch PVC end caps fit over them nicely, thus presenting a smooth edge to the sac fabric. Floor foam was then installed on the transom's unfinished fiberglass inner surface, over the PVC end caps.

                                The second item of note in the above photo is the floor foam on the underside of the seat support. The fiberglass there was surprisingly rough. A shot of 3M Super 77 spray adhesive did a nice job of holding the floor foam up there.

                                Another concern is screws protruding through various surfaces. See that little strip of floor foam in the lower right corner of the photo? I found that the screws used to hold the carpet strip in the passenger area stuck through the fiberglass AND the carpet in the underseat storage. They were not visible at all, but running your hand along there you could feel their sharp little self-tapping points sticking out. I nearly cut my fingers on a couple of them. A nice thin strip of foam eliminated the problem.

                                Likewise, the velcro pads that help hold the seat cushions in place are installed with sharp little screws that stick down into the underseat storage. These were all replaced with stainless steel bolts topped with nylock nuts, which have a rounded profile.

                                Another place this happens is on the disk that holds the optional table support, under the port side reversible cushion. Those pointy little devils were also replaced with bolts and rounded nylock nuts.

                                Yet ANOTHER concern are the four bolts that hold the rear seat's center section in place. This section is removable for access to the v-drive and transmission (and, now, the ballast fill pumps). The bolts pass through the center section from the engine compartment and receive washers and nuts in the underseat storage area. Fixing this is a simple matter of reversing how those bolts are installed; by starting them from the underseat storage, the excess bolt length sticks harmlessly into the engine compartment.

                                All for now, but more soon. Thanks!

                                Comment

                                Working...
                                X